
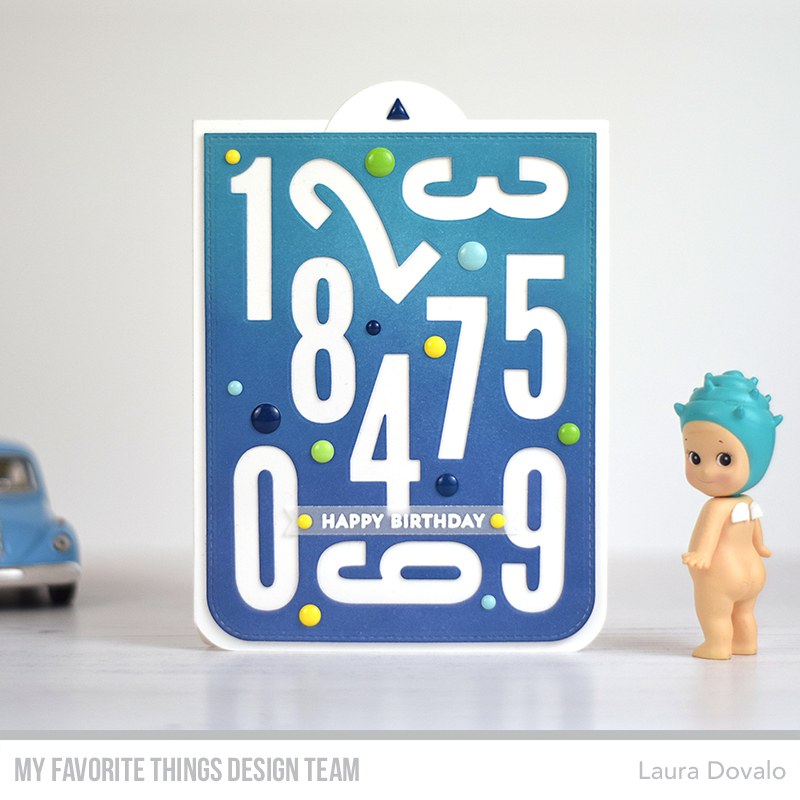
Hello there! I love the monthly Tips & Tricks feature over at the My Favorite Things blog! For the occasion, I’ve created an interactive typographic Birthday card using the Impact Numbers Die-namics.

When we pull the slider panel, one of the numbers is highlighted in yellow. I’s such a simple yet magical mechanism for a little boy, who is just about to turn eight…

I started by inking a panel of Smooth White Cardstock with Chipped Saphire and Broken China Distress Oxide Ink. Then I applied a layer of Distress Glaze over it to protect and bring out the colors. Next, I grabbed a sheet of graph paper and adhered the number dies and the frame die to it with strips of washitape.

It’s so easy to align the numbers this way and the thin paper allows us to cut one or two panels at the same time. I cut the second one in case I needed some more volume, but ended up using it as a sort of stencil later on.

I added strips of Scor-tape to the back of my panel, so that I could adhere it to a piece of acetate. Then I adhered the inside pieces of the numbers in their places.

I didn’t want to cut a notch in the main panel, so I used one of the dies from the Peek-a-Boo Wheel Die-namics to cut a slider panel with a semicircular tab instead. Using the die in this unindented way meant that I had to finish the cut with a craft knife.

As I mentioned earlier, I used the second panel as a stencil, so that I could adhere a piece of patterned paper from the Over the Rainbow Paper Pack to my card base, in exactly the correct spot. I temporarily adhered the paper, backed with Stick-It adhesive, behind the eight with two strips of washi tape.

Then it was just a matter of peeling off the backing paper, centering the panel to my cardbase and pressing down. Another problem emerged, however…

There was so little room to add foam tape to the back of my panel! Instead of cutting impossibly thin strips of foam tape, I cut strips of cardstock backed with Scor-Tape and layered them to create my own dimensional adhesive.

Now I could finish assembling the card and decorating my panel. By the way, I held the slider panel in its place with strips of washitape, so that it wouldn’t move during these delicate procedures…

Once again, I used my beloved Skinny Strips Die-namics to create a vellum banner with one of the sentiments from the Bitty Birthday Wishes. To decorate the simple panel, I added enamel dots in matching colors.
And that’s all for today. I hope you’ve find some of today’s tips and tricks useful. Have a great day!
Supplies used for the interactive typograhic card
This post is also available in: Español

