Me apetecía hacerle una tarjeta de San Valentín divertida a mi hija Iris este año y cuando las chicas de 3flowers propusieron un reto de tarjeta usando el «paper piecing» (estampar un sello sobre papel estampado y recortar) decidí matar dos pájaros de un tiro…
I wanted to make a fun Valentine’s Day card for my daughter Iris this year and when the girls from 3flowers challenged us to make a card using paper piecing (stamping on patterned paper and fussy cutting out the image) I decided to «kill two birds with one stone»…
Decidí usar el sello de cono de helado de una bonita colección de Hero Arts llamada «Fantastic Birthday». En realidad no tengo muchos sellos de contorno que se adecuan a esta técnica (los de Lawn Fawn o cualquier sello de los que se suelen colorear son perfectos).
I decided to use the ice cream cone from a beautiful set by Hero Arts called «Fantastic Birthday».I actually don’t have that many stamps with white space suitable for this technique (those that you usually color in, like Lawn Fawn’s stamps are perfect)
Usé tinta Archival Ink de Ranger (me gusta porque es un negro intenso) para estampar el mismo sello sobre diferentes papeles de la colección «Summer Bliss» de Echo Park Paper.
I used Ranger’s Archival Ink (I like it because it’s an intense black) to stamp the same image on different patterned papers from the collection «Summer Bliss» by Echo Park Paper.
El siguiente paso fue recortar las piezas estampadas dejando algo de margen para que fuera más fácil pegarlas superpuestas.
The next step was to fussy cut the stamped pieces leaving a small margin in some places to make it easier to glue them on top of each other.
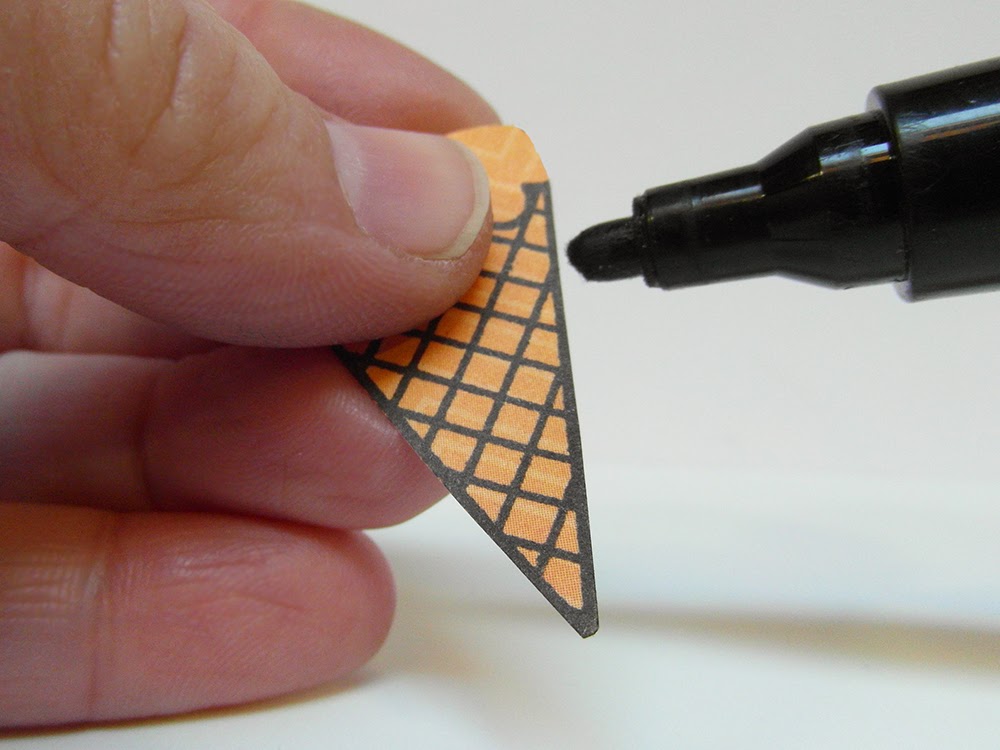
Con un rotulador permanente tracé alrededor de las piezas…
I traced the borders of the pieces with a permanent black marker…
A continuación uní las piezas alternando los colores…
Next I assembled the pieces alternating the colors…
Ahora tocaba estampar el sentimiento «Te amo más que al helado». Para ello usé este abecedario de Con sal y pimienta:
Now it was time to stamp the sentiment «I love you more than ice cream». I used this set from «Con sal y pimienta»:
Tracé una linea de apoyo con lápiz y una regla en forma de T sobre un trozo de cartulina blanca de 14,5cm x 10,3cm y fui estampando letra por letra…
I traced a faint line with a pencil and a T-ruler on a white 5.7″ x 4.0″ piece of card stock and stamped each of the letters individually…
Después borré la linea y pegué los helados encima del texto…
Next I erased the pencil line and glued the ice cream cones above the sentiment…
…y el trozo de cartulina sobre un trozo de goma eva de 14,2cm x 10cm para dar volumen. El goma eva fino se corta perfectamente con una cizalla para papel. (Perdón, no saqué una foto de este paso)
…and the piece of cardstock on a 5.6″ x 4″ rectangle of thin fun foam to give some volume. Paper trimmers cut thin fun foam perfectly. (Sorry, I didn’t take a picture of this step).
Lo siguiente que hice fue pegar esta pieza encima de un papel de corazones de la colección «Kiss kiss» de Crate paper de 15,2cm x 11,0cm que ya había pegado a una base de tarjeta blanca de 15,9cm x 11,7cm.
The next thing I did was to attach this piece to a 6″x 4.3″ piece of patterned paper from the collection «Kiss kiss» by Crate paper that I had already glued to a 6.3″ x 4.6″ white cardbase.
Uf, espero no haberos perdido con tantas medidas… Aquí están todas juntas:
- base de tarjeta blanca: 15,9cm x 11,7cm
- papel estampado: 15,2cm x 11,0cm
- goma eva: 14,2cm x 10cm
- cartulina blanca: 14,5cm x 10,3cm
I hope I didn’t lose you with all these measurements. Here they are all together:
- white card base: 6.3″ x 4.6″
- patterned paper: 6″ x 4.3″
- fun foam: 5.6″ x 4″
- white cardstock: 5.7″ x 4.0″
Pensé que le faltaba algo a la tarjeta así que corté tres mini corazones en cartulina rosa y los cubrí con Wink of Stella transparente y una capa de Glossy Accents para añadir a los conos.
I thought something was missing so I die cut three mini hearts from pink cardstock, covered them with clear Wink of Stella and a layer of Glossy accents to add to the ice cream cones.
También añadí un falso cosido alrededor del borde con un rotulador negro y por fin estaba terminada.
I also added some false stiching with a black marker and now it was finally ready.